Garage Door Springs
This is an introduction to the two primary kinds of garage door springs that are used on both commercial and residential garage doors. You will learn not only the various kinds of springs, but you will also learn about how these springs work to make your garage door work! The function of a garage door spring is to counteract the force of gravity on the door. So essentially, a garage door spring is supposed to make your door light enough for your own muscle or the power of the garage door opener to lift it up easily.
There are basically two types of springs.
- Garage door torsion springs
- Garage door extension springs
Torsion Springs
There are many types of garage door springs based on the application. On a large commercial door, we have the springs that are as small as an inch and three-quarters; this is a three-and-three-quarter-inch spring. They go in sizes all the way up to eight inches for an inside diameter. On residential springs they are usually an inch and three-quarters in inside diameter. Some are two inches, also two and a quarter inch springs, and sometimes even larger if there’s an extra heavy door.
Ideal Door
These types of doors come out with a newer type of torsion spring called an EZ-Set Spring.
And this spring has gaps in it; if you push the two ends together, the coils will press apart.
Wayne Dalton has produced the torque master springs, and these springs fit inside of a tube, similar to this one right here. And there are also steel rolling doors, which you may see on the outside of buildings, and they are widely used.
They have a tube that runs inside the curtain, and the curtain rolls up like a window shade, and when you pull the curtain down, it winds up the springs inside the tube. The curtain doors are similar to the one-piece curtain doors in that you have a spring and a curtain that wraps up around the core. On a one-piece curtain door, the ends usually have shepherds hooks for fastening one end onto the end brackets, the other end of the drum that supports the tube, and the cable drum that is attached to support the curtain as it rolls up.
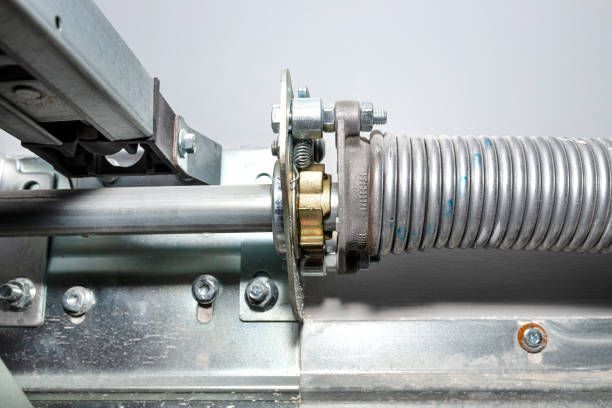
And when it’s open. At each end of a torsion spring, you have cones. On one end of the torsion springs is the winding cone. Usually there is a number on here that would designate the size of the cone. This spring there’s a designation that shows that it’s three and three-quarter inches. On the opposite end of the spring is a stationary cone. The stationary cone is mounted to a bracket, and then this bracket is secured to the header.
On the smaller residential springs you have a winding cone and a stationary cone. On this 1¾-inch cone, you’ll see a designation that designates it as 1¾ inch. Same on the stationary cone.
Residential Brackets
These are smaller, and these are stationary cones that were secured to the bracket, which is secured to the heater. Usually there’s a bearing that goes inside here.
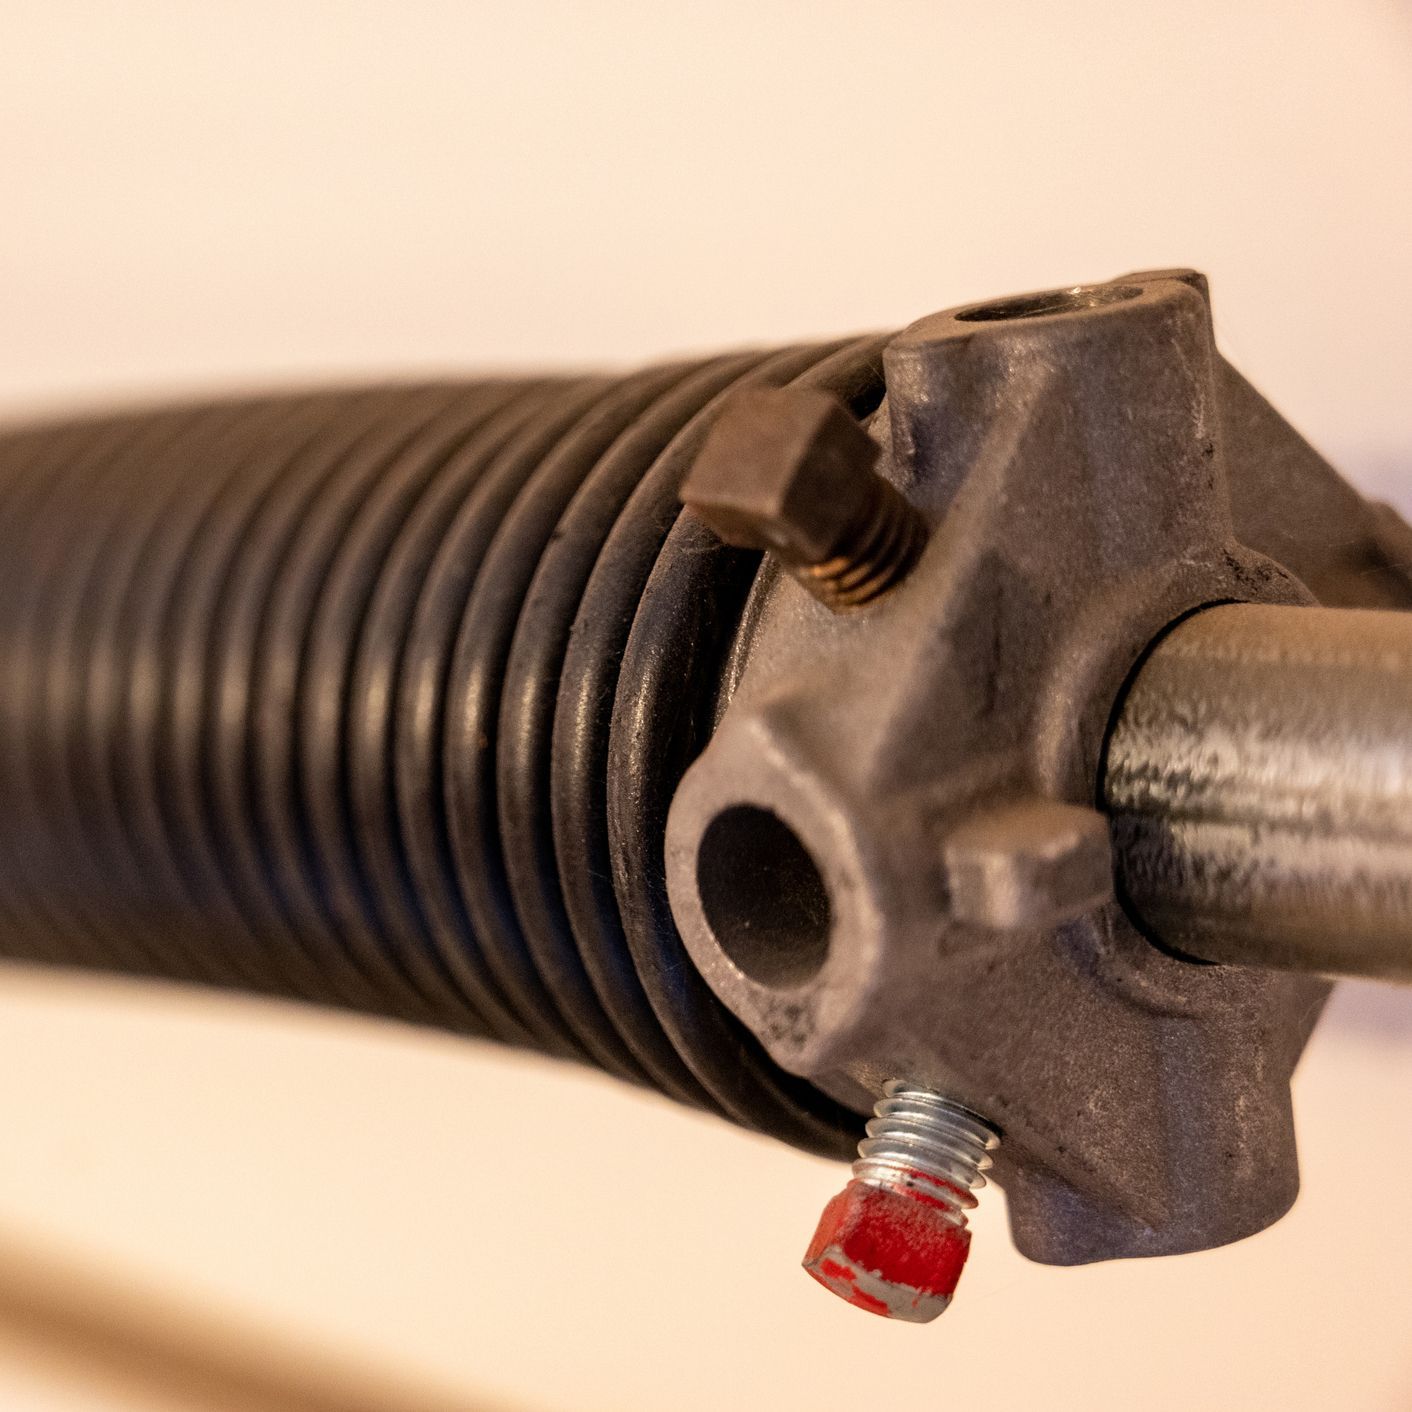
On EZ-Set Springs there’s usually a winding cone on one end similar to the one you have on a standard torsion spring; we usually call that the anchor end, and at the other end is a winder cone that screws into the springs, and then this winder cone snaps into a winder, and then the screws are turned to wind the spring. The cable drums are different on these types of spring assemblies. On the Commercial Springs, sometimes very large drums are used for cables.
On residential drums they are usually 4 inches.
On EZ-set springs the drums are usually about two and a half inches or two and five-eighths inches.
Torque Master Springs
This type of spring comes inside of a liner, and this end of the liner is larger than the plastic that covers the spring. The purpose of this liner is to keep the spring from rattling inside the tube when the door is opening and closing. One of the biggest problems that we’ve had when customers are trying to replace the springs is they pull on the spring and it won’t come out. The reason is that the part that is inside the tube is bigger than the plastic liner. So it’s like this is inside the tube, and they’re pulling and pulling and pulling, but the only way to get this out is to get some needle-nose pliers and pull on the plastic, and then this part will come out.
More About Easy-Set Springs
The coils on standard torsion springs are tied together. If you pull the spring at each end, the coils will come back together. On graphed springs, the EZ-set springs and the coils are separated; you can pull them apart, but they don’t snap together. But if you push them together, they will separate.
The EZ-Set Springs have gaps between the coils; you can slide a piece of paper between the coils. But standard torsion springs are wound tight; the coils are tight together, and you can’t fit a piece of paper between the coils.
Extension Springs
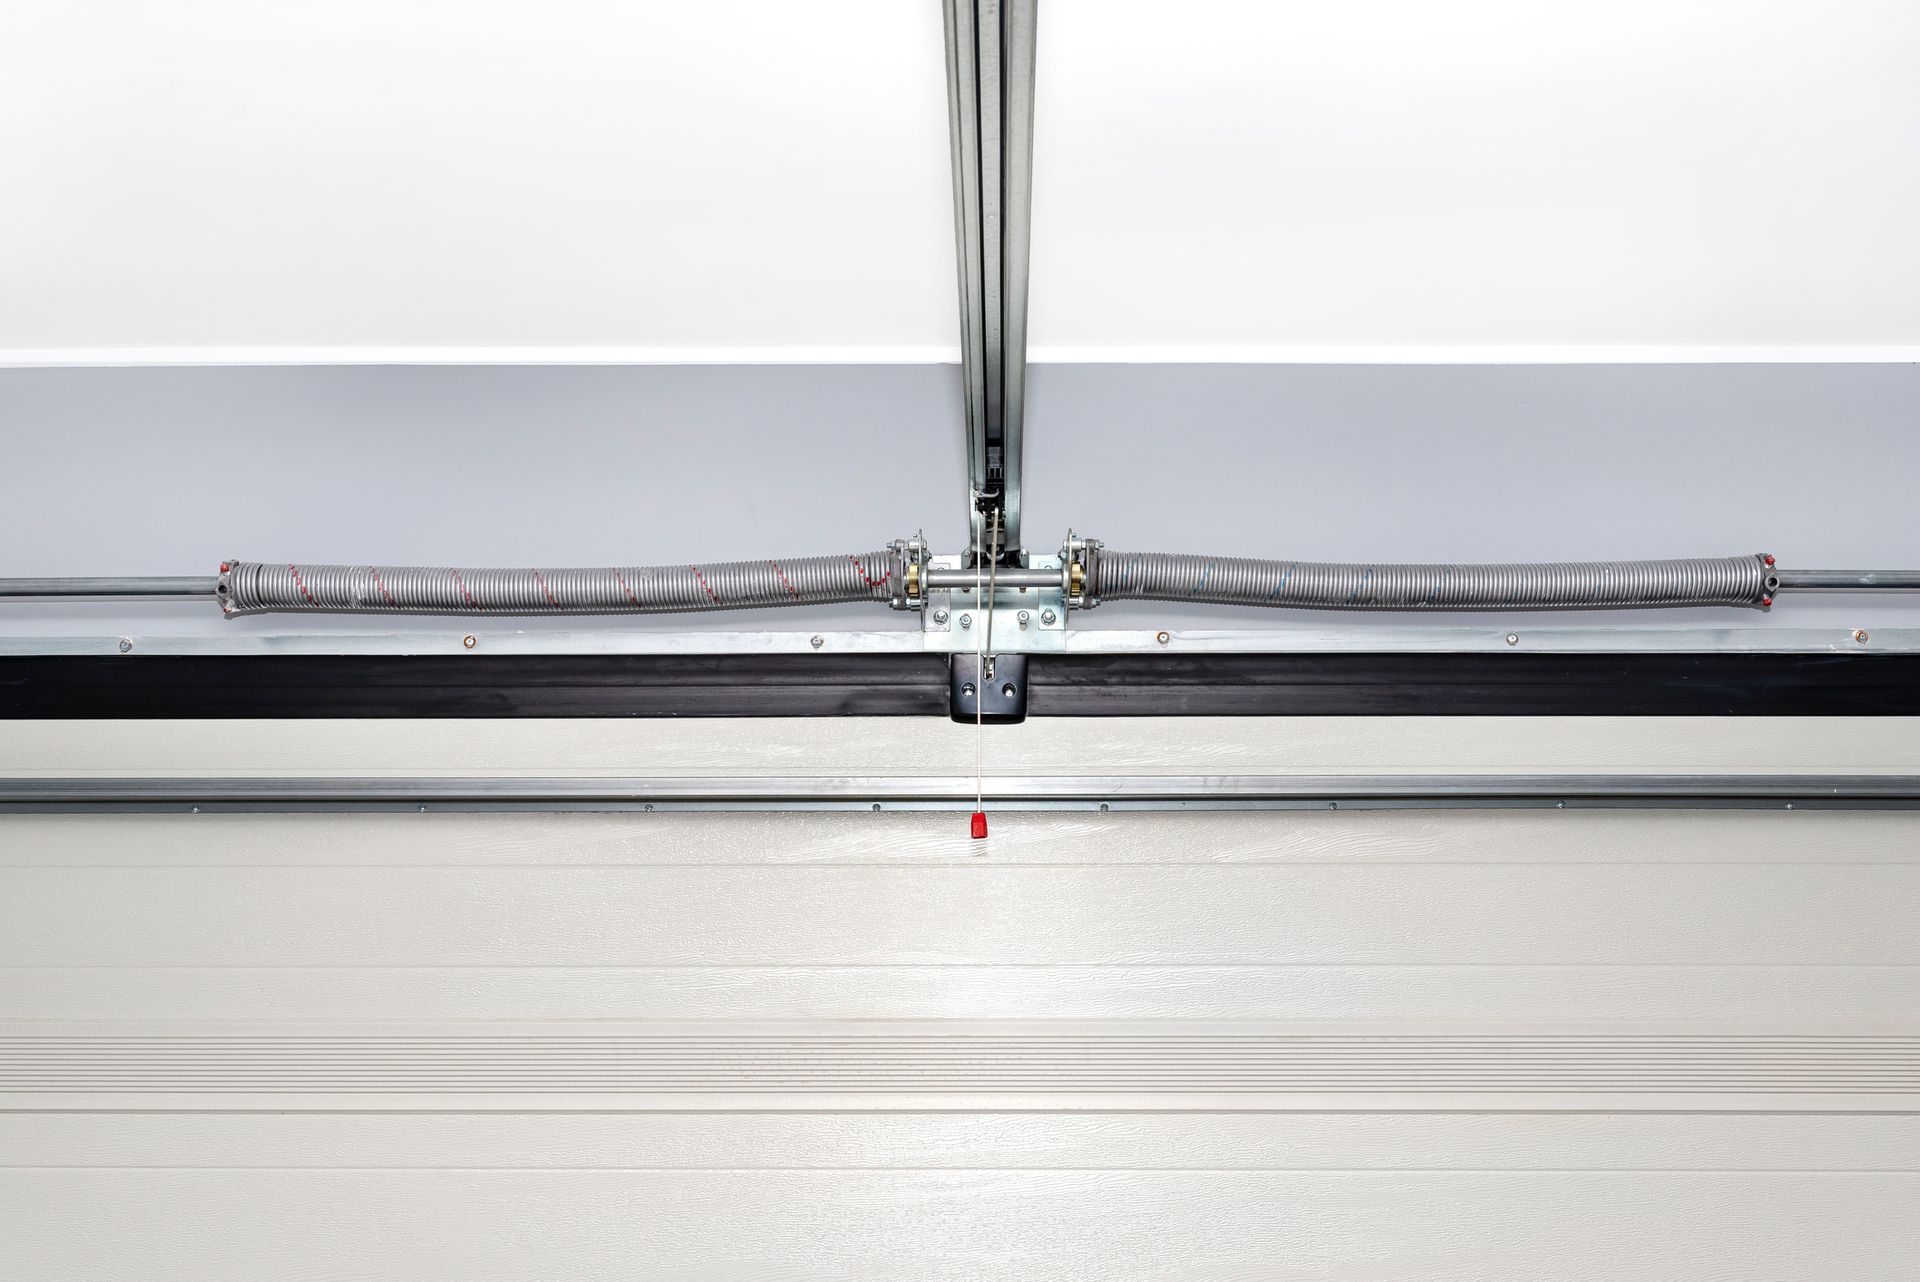
The other type of spring is the extension spring. Whereas torsion springs wind around a tube or inside of a tube, extension springs stretch as you close the door and they shrink as you open the door. At one end of the spring is a pulley, and at the other end there’s usually an eye bolt or an S-hook that connects to the back of the track angle.
The other type of extension spring is the extension spring for the one-piece door; these are usually shorter. They are also wound tight, and it’s very hard to separate because they have initial tension on them, usually fifteen or twenty percent. But rather than pulling against the cables with a pulley, these pull against a lever arm, and that gives you the balance that you need to make the door easy to open and close.
One Type of One-Piece
A piece of door spring that’s really popular, especially out west, is the Holmes one-piece extension spring. These springs are different in that they have a plate that is screwed in to the end of the spring, and this plate, on the top, attaches to a pivot point; on the bottom, a lot of times there are different mounting pieces, such as brackets, that will mount to, usually, the jamb at the bottom, and then as the door is opened and closed, the spring stretches and contracts.
One nice thing about the Holmes Springs is that there are two safety wires inside, and as the spring stretches and contracts, these wires stay inside so that if the spring breaks, it doesn’t go flying off and possibly damage the car or hurt someone.
Garage Door Openers
Garage door openers are the necessary components of garage doors because without them the garage door will not work properly. Many times people asked about what the best garage door opener is for my particular house. The answer to that question really depends upon your application. There are 3 types of openers.
Screwdriver Openers
The Jeannie screwdriver opener is noisy, and so we don’t recommend the screwdriver openers because of their reliability issues and the noise that they make.
Chain Drive
Life Master is an excellent choice for detached garages; they are extremely reliable and work like crazy. However, they are a little bit noisy.
Belt Drive
These types of openers are highly recommended when you have a garage attached to your house. The reason why these openers are highly recommended is that they’re the quietest on the market, and you can actually have a bedroom above the garage door, and you cannot hear the garage door open.
So here I have discussed all 3 types of openers. But in most cases I recommend belt drives for people that have garages attached to their house; they’re extremely quiet and extremely reliable. If you have a detached garage, most of the time we recommend a chain drive, and it will save you some money. In most cases I do not recommend screwdriver openers.
Garage Door Safety Cable Installation
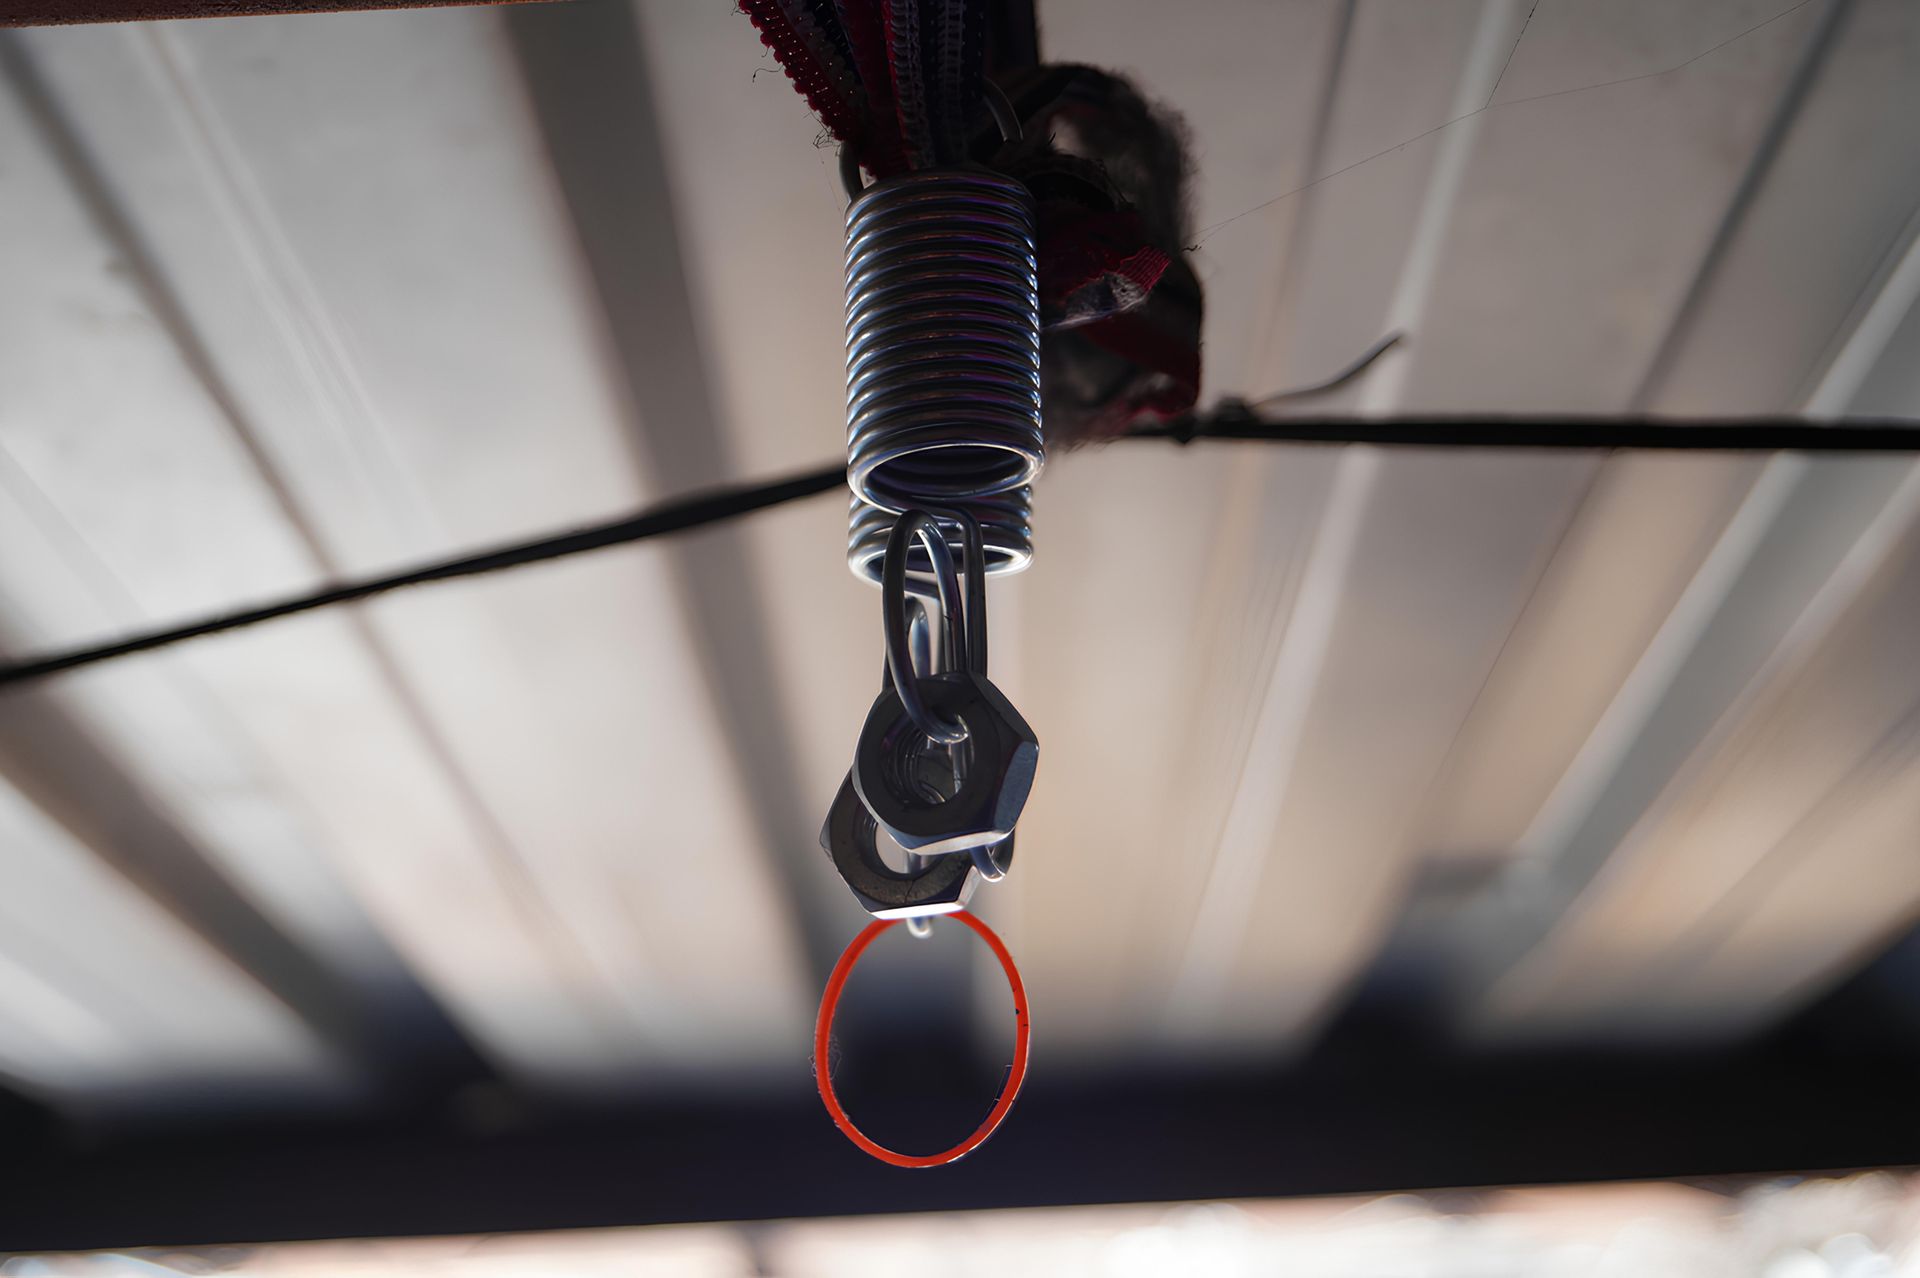
Safety cables are the single most important component of an extension spring door. The safety cable keeps the extension spring from containing the spring or cable failure. If your garage door has an extension spring lifting system and there is not a safety cable running through the center of the spring, it’s a good idea to install one. The steel used to make the springs has a lifespan, and eventually that spring will break, and when it breaks, if there’s not a safety cable running through it, it could fly around your garage and damage your car or maybe something in the garage or maybe you. So we are going to discuss how you can install safety cables for your garage door.
Ready-made safety cables can be purchased. There’ll be a loop on one end and a cable adjustment clip on the other. Measure the height of your door so that you purchase the correct length of cable. First of all, you have to disconnect the power from the opener and then disconnect the door from the opener. Now manually raise the door and then use a pair of locking pliers and clamp them on the track just below the bottom roller of the door. When the door is open, there is very little tension on the springs, and with the power off to the opener and the door clamped, it is safe to install the safety cables. Use the loop end and fasten the cable to the hair, pass it through the loop, and ideally you would like this end of the safety cable to be closely in line with the spring. Make sure that you pass the cable through the loop end because often it’s at this spot where the spring will break.
Then pass the cable through the center of the spring, come out the other end of the spring, and go through the loop. The end on the hanger should look like this.
Then attach the other end of the cable to the horizontal angle iron that’s at the opening of the door. Usually it works to attach it in this very end hole right here, but depending on your setup and your door, you may have to adjust it and terminate it back further on the angle iron. If you’re able to use the cable adjustment clip, use a bolt and nut and fasten it to the angle iron.
IF the cable is too long, you’ll have to cut it at the end that has the cable adjustment clip attached to it by a wire rope clip and use it to terminate this end of the cable. Tuck away any loose cable ends so they don’t get caught when the door is open and closed. If you need to cut the safety cable and you don’t have a pair of cutters, you’ll need a hammer and a cold chisel. If you don’t have a cold chisel, it’s cheaper to buy a cold chisel for up to $6 as opposed to a cable cutter. Wrap two pieces of electrical tape on each side of where you want to cut the cable. Place the cold chisel in between the two pieces of tape and give it a good whack. And by doing this you may get a nice recut cable. When the safety cables are installed, they should be fairly tight and below the lifting cable and the pulley on the end of the spring. Repeat the process and install the safety cable onto the spring on the other side of the door. Remove the locking pliers, manually open and close the door slowly several times, and make sure that the lifting cables and pulleys aren’t getting tangled up with the safety cable. You may have to adjust the length of the safety cable to get things to work properly. Reconnect the door to the opener, reconnect power, and done. Now you have successfully installed the garage door cable.
Garage Door Safety Eye
So here we are going to discuss garage door safety. So if you want to check your garage door safety, then you have to hit the button on your remote to close it, and then you will see a light blinking in the opener, and if you hit the wall button, it does the same thing.
Most of the people are always concerned about one of the kids getting stuck underneath the garage door or it coming down on top of them. What should I do? How can I test that? Should I be concerned about that? The garage door is the largest movable item in your house, but there are various safety features built right into it. For example, if you notice, there are the electric sensors, which were installed on the bottom side of the garage door, and these sensors were installed on both the left and right sides.
If anything breaks that beam while the door is closing, then the door automatically stops and reverses and goes back up. Additionally, there’s a contact sensor, which means if it comes down and makes contact with anything in its way, it’ll stop, reverse, and go back up. And it’s a sensitivity setting that was installed on the unit itself, and when it makes contact, it stops, reverses, and goes back up. Now the Consumer Products Safety Commission recommends that you check this by putting a 2×4 or 2×8 (this happens to be a two by ten) in the pathway and then closing the garage door, and what should happen when it makes contact with the board is that it should stop and reverse. So the other thing you may want to check is the balance of the door, and you can do that by unlatching the electric opener and then actually lifting up the door, and you can do this with only one hand, and it does not require any effort or technique. And if you move your garage door up and down relatively smoothly, then that will be a good indication that it is balanced well. If you were to do that and it came just crashing down and you couldn’t hold it up with one hand, that may indicate that your torsion spring up here needs to be adjusted. We would not recommend that you try to adjust those torsion springs yourself; you would have to hire a professional because it can be a dangerous little task if you’re not 100% sure what you’re doing.
Decorative Garage Door:
Garage doors are practical and convenient, but they often leave a dull, blank element in your home’s façade. An easy solution is installing decorative garage door hardware—something readily available at your local hardware store. Installing garage door hardware, such as hinges and handles, is an inexpensive project suitable for DIYers of all skill levels. Here’s what you’ll need to take on this task.
- Drill
- Level
- Pencil
- Screwdriver
- Decorative Hinges
- Decorative Handles
Hinges:
Center hinges are found in the middle; they help operate the door in a sectional way above your head. The hinges on the end are a little bit different. The hinges on the end have two holes. The outside hole is where the roller goes; this is the roller, and that operates on the track. The outside sticks out further as you go up the door.
Before starting, wear safety elements such as glasses and gloves.
Step 1—Position Hinges:
Position your hinges anywhere on your garage door except over the horizontal joints that open when the door rolls up. They should also be clear of any weatherstripping on the sides of the door. Put the hinges in place and mark your first hole.
Step 2—Install Hinges:
Check manufacturer instructions for the recommended bit to use, then pre-drill your first hole. Unless your garage door is made of wood, the surface material will be thin. Stop drilling as soon as you feel the bit pierce through. Attach the first side of your hinge, then use a level to ensure it's properly aligned. Mark your second hole, pre-drill, and attach the other side securely with a screwdriver. Be careful not to overtighten, as screw threads can easily break through the door’s thin surface. Install all your hinges in this same manner.
Step 3—Lay Out Handle:
Hold your new handle in place and lightly mark the top and bottom holes. Remove it, then use a small level to draw a vertical line from your top mark. Put the handle back in position and remark the second hole so it falls along your level line.
Step 4—Install Handles:
Pre-drill according to your marks. Line your handle along the holes and screw into place. Repeat this process for your other handle. Your installation is complete! Step back and admire your new garage hardware.
Call (904) 724-4401 for expert garage door spring repair in Jacksonville, FL.


